VoIP setup guide: Skymesh supplied SPA 112 ATA
Here is everything you need to get started with your VOIP service, using your Skymesh-supplied Cisco SPA 112 ATA.
(If you’re using a different router, click here to see a list of supported equipment in our knowledge base, then select the router or ATA you’re using.)
Before you set up your ATA, we recommend connecting your computer and the SPA 112 ATA to a numbered LAN port on your router using an Ethernet cable.
Accessing your ATA
In order to access the ATA, you’ll need to obtain the IP address of the ATA.
- Connect an analog phone to the Phone port of the ATA. (Line 1)
- Press the star key four times: ****
- After the greeting plays, enter the following sequence: 110#
- Note down the numbers (IP address) the unit advises you. Your IP address will be a group of four numbers, like “192.168.1.50”
- Open a web browser (e.g., Internet Explorer, Chrome, or Safari. Firefox will not work with the ATA).
- Enter the IP address you discovered into the address bar using the following format: http://ip address:38081 or ip address:80
(If you can’t find your address bar, press the “F6” button to highlight this section of your browser.) - The ATA will ask you for your username and password. Your username is ‘admin’ and the password is the admin password for this device.
- You can also try using the username ‘admin’, and the password ‘admin’.
Configuring your ATA
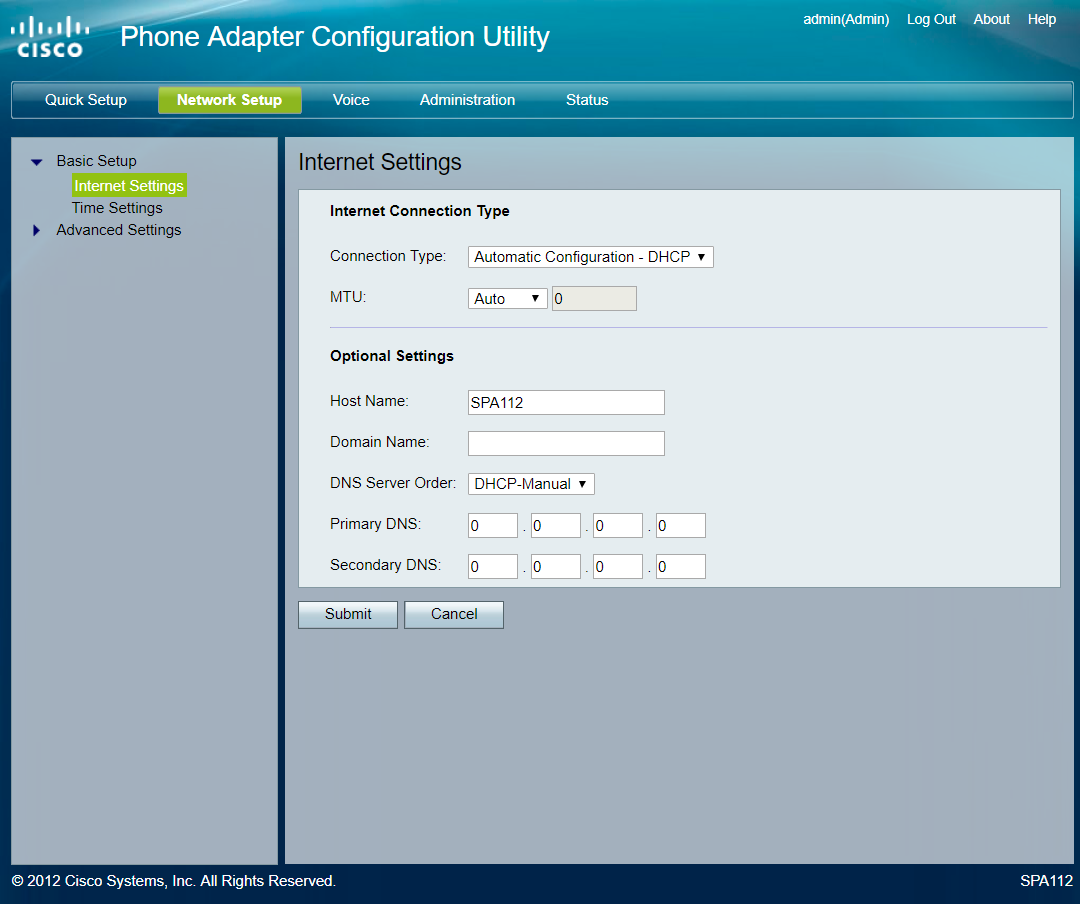
Network Setup: Ensure DNS Server Order is DHCP-Manual
Network setup
- Click on the “Network Setup” heading at the top of the screen.
- Click on the “Basic Setup” heading, in the column on the left-hand side of the screen.
- Click on the “Internet Settings” sub-heading.
- Ensure “DNS Server Order” is “DHCP-Manual”.
- Click on the “Submit” button.
- Click on the “Time Settings” sub-heading.
- Select your Timezone from the list of Australian time zones. Australian Time zones are GMT +8 to GMT +10:30.
- Click on the “Submit” button.
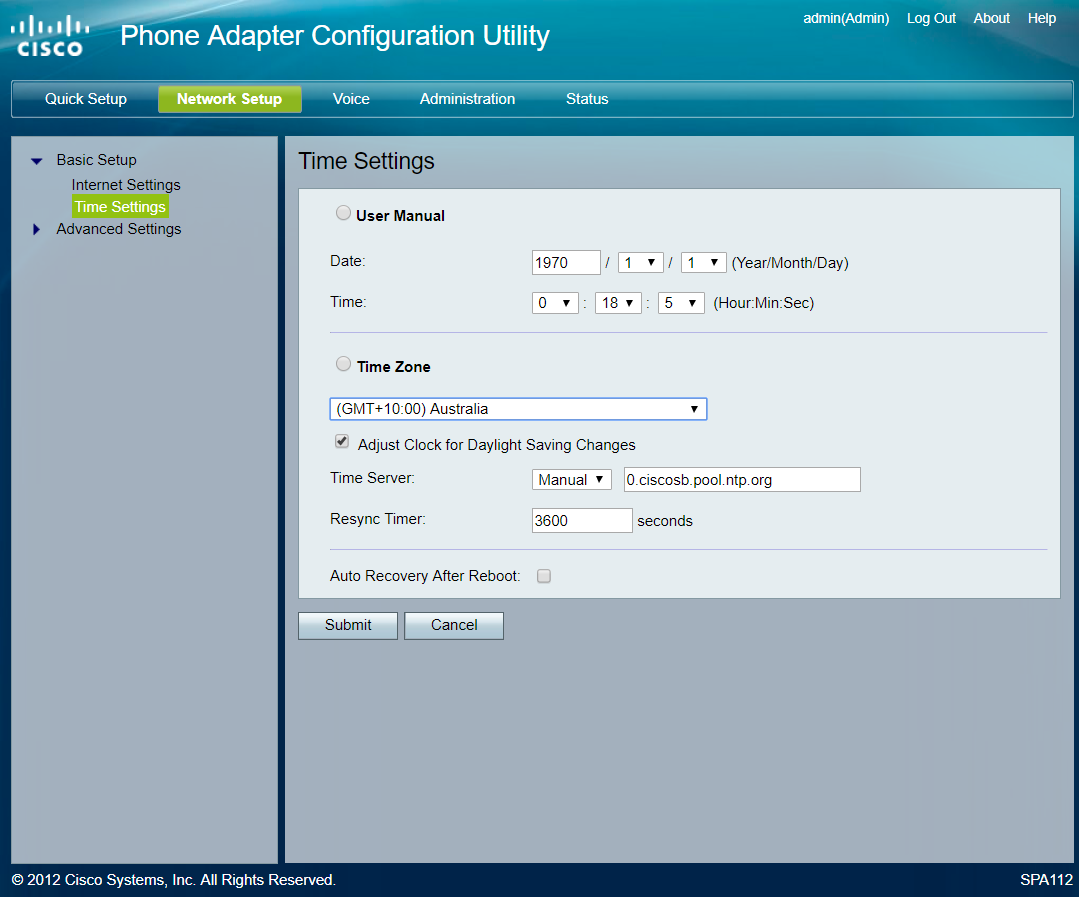
Time Settings: Timezone should be your local timezone.
Voice setup
Voice tab: RTP Packet size set to 0.020
- Click on the “Voice” heading at the top of the screen.
- Click on the “SIP” heading in the column on the left-hand side of the screen.
- Make the following changes:
RTP Parameters
RTP Packet Size:0.020
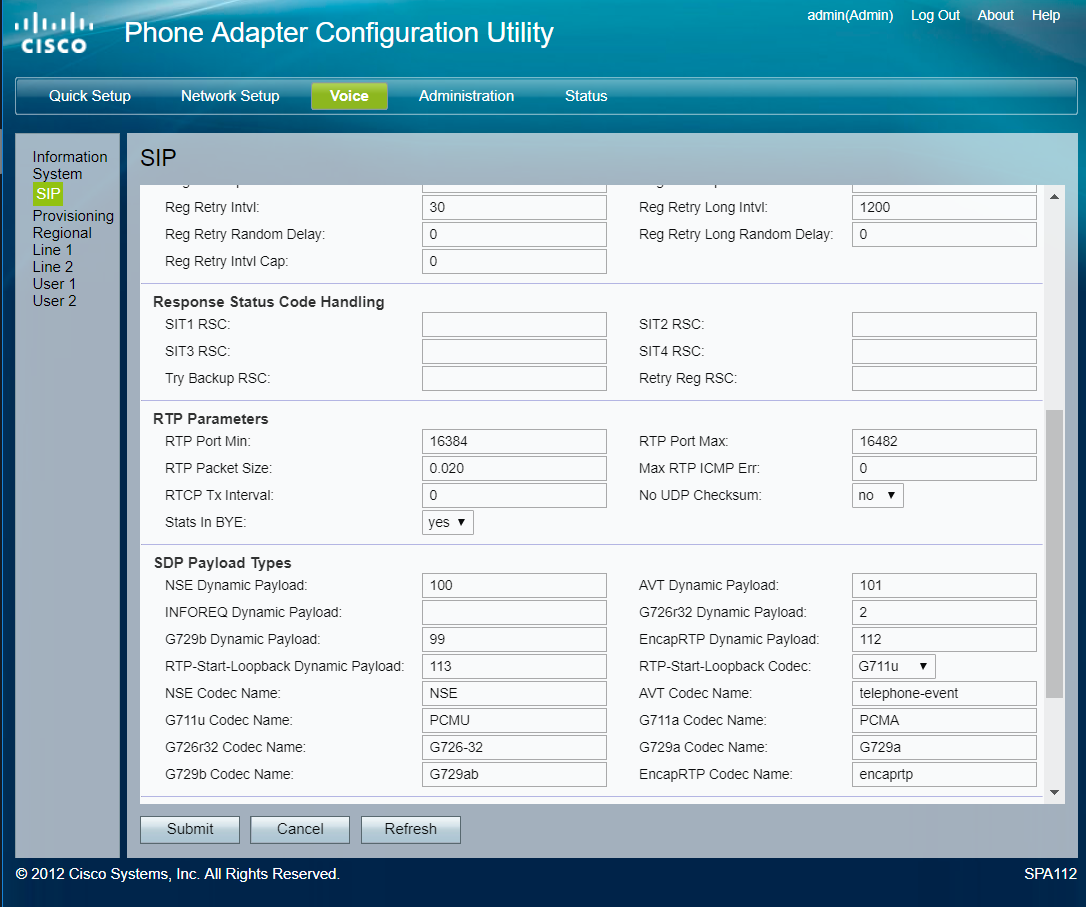
RTP Packet size set to 0.020
- Click on the “Line 1” heading in the column on the left-hand side of the screen.
- Make the following changes:
NAT Settings
NAT Mapping Enable: Yes
NAT Keep Alive Enable: Yes
Network Settings
SIP ToS/DiffServ Value: 0xb8
Network Jitter Level: High
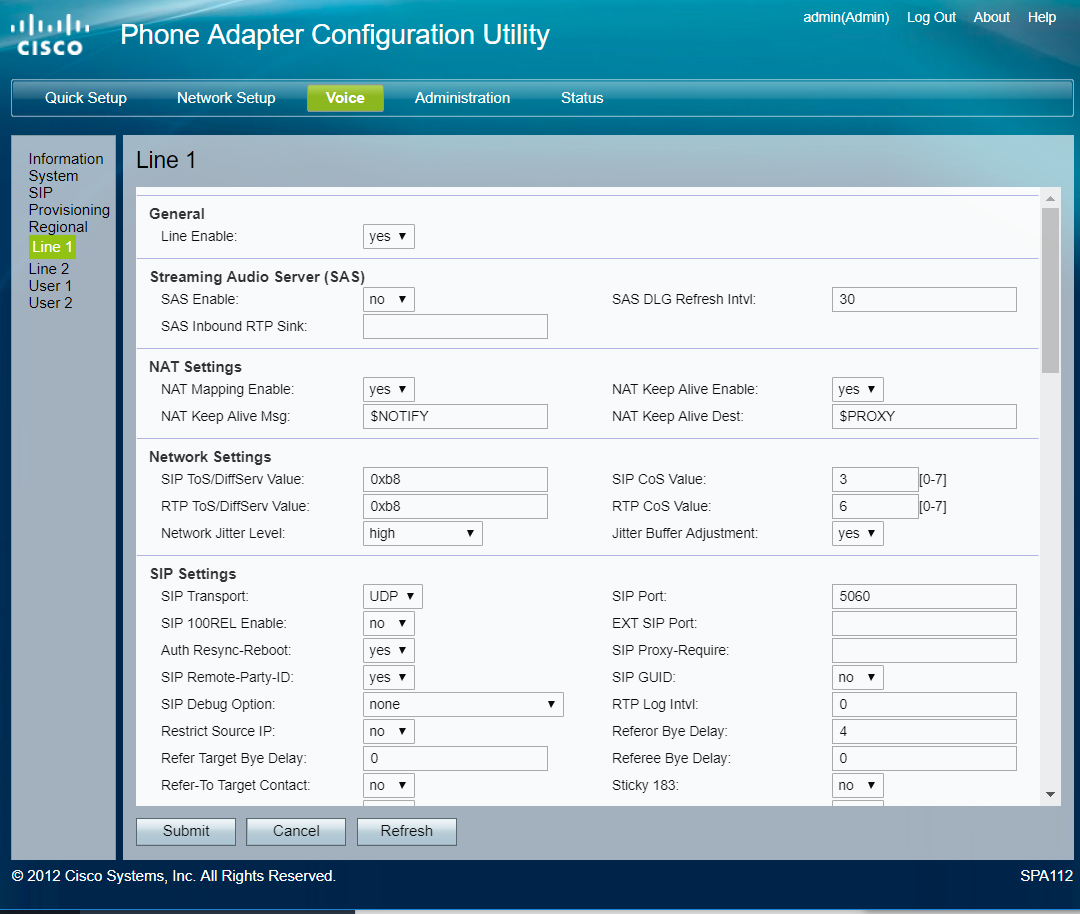
NAT settings, Network settings and SIP settings
Proxy and Registration
Proxy: Use otw.skymesh.net.au for your SIP Server.
Outbound Proxy: Use otw.skymesh.net.au for your SIP Server.
Use Outbound Proxy: Yes
Register Expires: 120
Proxy Fallback Intvl: 120
Subscriber Information
Display Name: Use the Phone Number from your welcome email.
User ID: Use the Phone Number from your welcome email.
Password: Use the SIP PASSWORD from your welcome email.
Auth ID: Use the Phone Number from your welcome email.
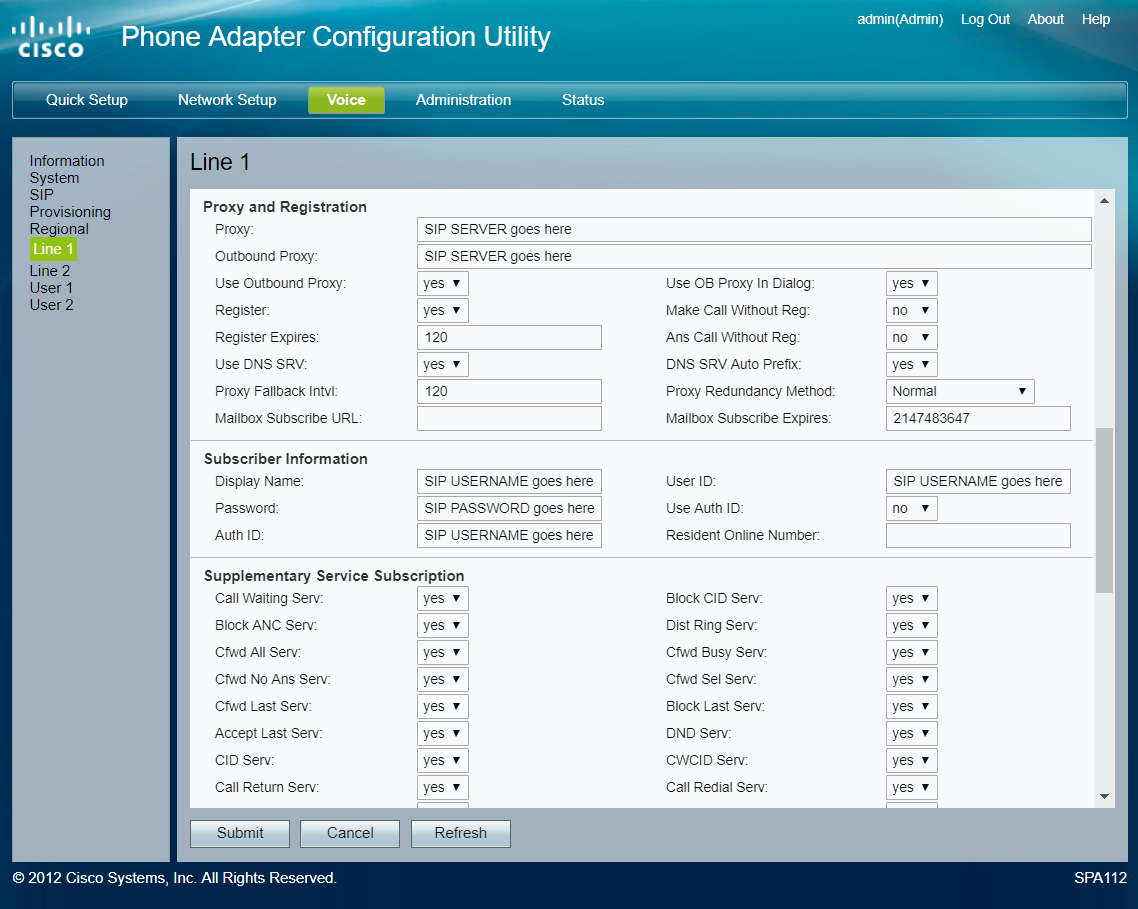
Line 1 setup. Your SIP credentials are in your welcome email.
Audio Configuration
Preferred Codec: G711A
Use Pref Codec Only: Enabled
Dial Plan
Copy and paste the appropriate Dial plan into the ‘Dial Plan’ section of your ATA.
Your dial plan starts and ends with (brackets), and should not contain leading or trailing spaces:
Default dial plan: (*xx|346911|0|00|2-9xxxxxx|1xxx2-9xxxxxxS0|xxxxxxxxxxxx.)
NSW dial plan: (023478xxxxxxxxS0|4689xxxxxxxS0|0011xx.|131-9xxxS0|1300xxxxxxS0|18xxxxxxxxS0|19xxxxxxxxS0|122x|121|000)
VIC, TAS dial plan: (023478xxxxxxxxS0|4589xxxxxxxS0|0011xx.|131-9xxxS0|1300xxxxxxS0|18xxxxxxxxS0|19xxxxxxxxS0|122x|121|000)
QLD dial plan: (023478xxxxxxxxS0|345xxxxxxxS0|0011xx.|131-9xxxS0|1300xxxxxxS0|18xxxxxxxxS0|19xxxxxxxxS0|122x|121|000)
NT, WA, SA dial plan: (023478xxxxxxxxS0|6789xxxxxxxS0|0011xx.|131-9xxxS0|1300xxxxxxS0|18xxxxxxxxS0|19xxxxxxxxS0|122x|121|000)
Click the “Submit” button. The SPA112 will save and reboot.

After performing these steps, make a test call with your phone. You should now be able to make and receive calls using the Skymesh VOIP service.
If you need any further technical support, get in touch with us through email or call the Skymesh Support hotline on 1300 759 637.